Cool Tip: Support Your Local Vegetables
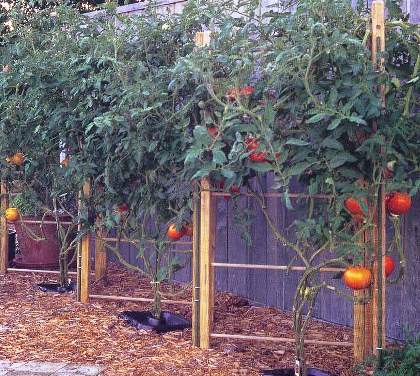
It’s tomato planting season, which means that we not only search for the perfect tomato seedlings, but, almost as important, the perfect way to support them as they grow. Tomatoes always seem to outgrow their cages, and the commercially available cages just aren’t all that attractive or effective.
Several years ago there was a wonderful, albeit short-lived, magazine called “Kitchen Garden” that covered everything from planting through harvesting to cooking your produce, with wonderful tips and advice. One day I voiced a long-held wish to Kennedy that we could find good-looking, effective tomato support. The next day our latest issue of the magazine arrived and, lo and behold, (I’ve always wanted an excuse to use that in a sentence) there was an article entitled “Support Your Vegetables in Style”. It recommended building a series of simple ladders that can be easily and dynamically hinged together in any configuration you want, year after year.
Here are the instructions for building great tomato supports....
Construction is Quick and Easy
The materials needed for this project are readily available at building-supply stores and garden centers (see materials list below). You'll need a drill with a ½-in . bit and an 11/16-in. bit, a hammer, a tape measure, and a pencil.
What You’ll Need for Each Ladder
Each completed section Is 4 ft. high and 2 ft. wide, and requires:
- Two 2-in. x 2-in. x 4-ft. pieces of wood for side supports, preferably redwood , cedar, or pine (treated or untreated). Select pieces that have minimal knots, warp, and twist.
- Five 1/2 in. x 2-ft. hardwood dowels for ladder "rungs".
- Four #6 x 2-ln. eye screws for connectors.
- Outdoor (type II) glue, such as Titebond II.
- Ten 1-in. brads.
- Two 1/2-in. x 5·ft , steel garden stakes, available at most garden centers.
Measure twice, drill once.
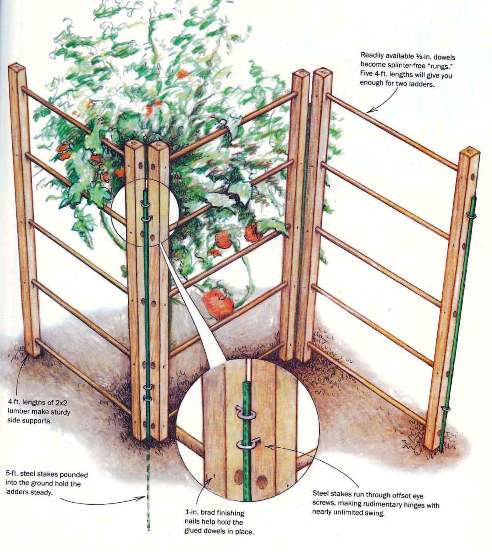
- Before drilling, mark the placement of the five dowel holes on each 2x2. Using a tape measure and pencil, mark each 2x2 at the following places: 3 in., 13 1/2 in., 24 in., 34 1/2 in., and 45 in. (I make a template, so I only have to measure one piece.) With the 1/2-in. bit, drill through the 2x2 at each mark. Be careful to center the holes and drill straight. This is a good time to round over any sharp edges with a piece of coarse sandpaper.
- Now mark the holes for the eye screws. To ensure that you make these holes on the correct sides, layout the 2x2s in the way they'll be put together. Using an 11/16-in. bit, drill two holes on the outer face of each 2x2, just the depth of the eye screw shank. Vary the placement so that when you put 2 or 3 ladders together at a corner, the eye screws are not at the same height. The eye screws must be on the outer faces of the supports, or they won't work.
- Insert the dowels between the supports without glue to make sure they fit. If the dowel is slightly smaller than the hole, the glue will most likely compensate for the difference. If the dowel is too large, lightly sand to size, then coat the dowel ends with glue and slide back into the holes. If necessary, tap the dowels into place with a wooden mallet. To keep the dowels in place, nail a 1-in. brad through the side of the 2x2 into the dowel (see detail above).
- Finally, the eye screws go into the pre-drilled holes.
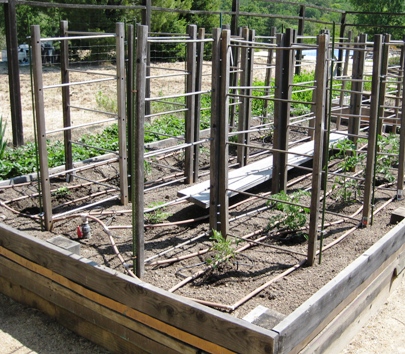
Set up the ladders to suit your needs. To install a series of ladders in the garden, place sections side to side so the eye screws are at different heights. Connect the sections by inserting the garden stakes through the eye screws, and push the stakes 18 in. into the ground. To set up a triangular tower, you may need to loosen the eye screws a little bit so you can get the sections to join.
We’ve been using these supports for years and love them. We use what we call a condo-style, where we join 3 ladders together to form a T and then form another T starting with the end of the first T, so the configuration looks like this: